Behind the Build: Step-by-Step Look at a Recent ADU Project
Ever wondered what goes into building an Accessory Dwelling Unit (ADU)? Spoiler alert: it’s more than just pouring some ready mix concrete and calling it a day.
Whether you're a curious homeowner, aspiring DIY-er, or just a fan of power tools and building construction, welcome to a behind-the-scenes tour of one of our recent ADU projects. Buckle up—this build had it all: permits, backhoes, construction workers, and plenty of coffee-fueled daily reports.
Step 1: Planning & Permits – The Paper Chase
Before we could even touch a hammer, we kicked things off with planning. This involved pulling blueprints, crafting a detailed floor plan, and submitting our bid based on both CAD (Computer-Aided Design) layouts and BIM (Building Information Modeling).
We coordinated with the city, navigated zoning codes, and addressed soil reports (hello, expansive soils). We’re not saying we deserve a medal—but we wouldn’t say no to one either.
Step 2: Site Prep – Dig It Up
Once the paperwork was out of the way, the construction site was cleared. This is where the backhoe became the star of the show—digging trenches for utilities and prepping for the foundation.
We also did some serious grading to ensure proper drainage (because nobody wants a flooded ADU) and set forms for footer (footing) work.
Step 3: Foundation & Slab – Rock Solid
Next came the foundation pour using ready mix concrete. For this ADU, we used a floating slab with flatwork around the perimeter. To protect against moisture, we added damp proofing and reinforced the slab with rebar (because safety never goes out of style).
Fun fact: Our crew even chanted “float it, don’t fight it” while floating the slab. It's tradition.
Step 4: Framing – It’s Taking Shape!
With the foundation cured, it was time to raise the bones of the structure. Framing began with precision, using glulam (glued laminated beams) for extra support and girder trusses to carry the load.
We added frieze board (bird block) for ventilation and prepped the gable ends. From walls to roofline, it all started coming together fast thanks to our team of skilled builders and home builders.
Step 5: Mechanical, Electrical, Plumbing – The Unsung Heroes
Behind every functioning ADU are pipes and wires making magic happen. We roughed in the plumbing, HVAC (forced air heating/cooling), and electrical—complete with GFCI (Ground Fault Circuit Interrupter) outlets in all the right spots.
This is the moment when the skeleton of the build starts to get its nervous system—and coffee starts disappearing faster than our cost codes can track.
Step 6: Exterior & Roofing – Sealing the Deal
With utilities in, we moved on to exterior protection. The roof got a fresh layer of felt (underlayment) and carefully installed flashing to prevent leaks.
We installed fascia boards and prepped for siding. Depending on client style, we offer everything from stucco to green board (pressure-treated lumber) siding, especially for green building or passive house designs. Oh, and we use fire-resistive materials too—because smart construction is safe construction.
Step 7: Interior Work – Where Style Meets Structure
Inside, things started getting cozy. Drywall, paint, cabinets, flooring—it all comes together. Meanwhile, our general contractor kept the change orders in check, tracked updates via cost-plus contract, and made sure we stayed within the client’s cost to build a house budget goals.
Thanks to careful scheduling, each contractor knew when to show up and what to tackle next—making the construction company look like a well-oiled machine.
Step 8: Final Touches – The Grand Reveal
As we neared the finish line, we completed punch list items, installed final fixtures, and cleaned up the site. This included touch-up paint, final form stripping, and making sure everything was up to code.
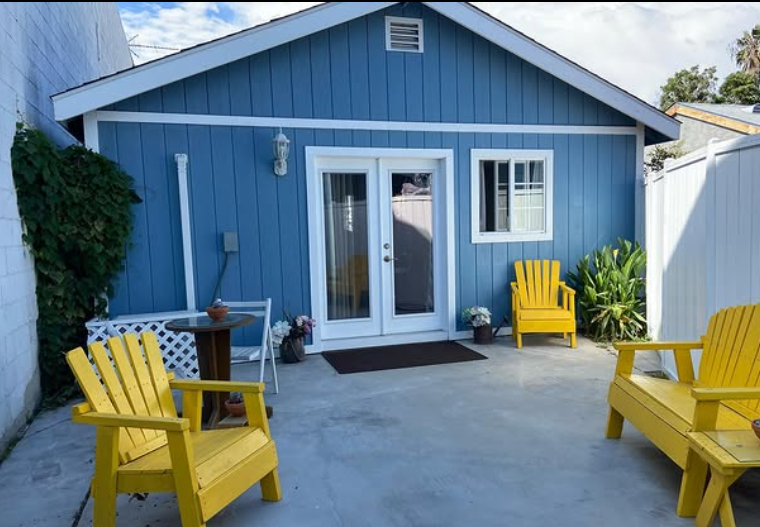
From siding to foundation, this ADU stood proud—ready for its new occupant (and maybe a cute dog or two).
A Few Fun Extras
We included energy-efficient windows and doors for better performance and insulation.
Smart home wiring? Yep. Built in.
Landscaping and exterior flatwork added those final wow factors.
The Takeaway
Building an ADU isn’t just a side hustle—it’s a full-scale project requiring coordination, expertise, and just a little construction-site magic. With the right team of custom home builders, solid construction management, and a reliable construction company, you can transform a backyard into a fully functional, stylish living space.
Thinking of building your own ADU? Let's talk floor plans, bids, and making that dream backyard unit a reality. Because the only thing better than a new home… is a second one right outside your door. 🛠️🏡
Follow for more behind-the-scenes tours and tips from your local pros in L&T Construction, building construction, and beyond!